Overview
Checking out a pet is the final step in completing an appointment and ensuring all services are accurately recorded and paid for. During checkout, staff can review and confirm service pricing, apply available packages, and collect payment from the pet owner. This process supports flexibility in payment, allowing staff to take full or partial payments, as well as add any last-minute charges before finalizing the invoice.
With our Invoices V2 release, we have improved the functionality of invoices to better handle adjustments, discounts, coupons, and packages. This article walks you through how to use these updated invoices, including adding items in the Services section, applying adjustments, and ensuring taxes are calculated correctly. You’ll also learn how to add or modify items as needed before finalizing the total. With these tools, you can confidently create and collect payment on invoices.
Please note: With the Invoice V2 release, invoices for existing appointments are unchanged and will still use the old formart. Only new appointments and invoices created after the release will use the updated invoice format.
Checking out can happen in the following areas:
- Viewing appointment invoice
- Appointments tab > Checkout
- Daily Snapshot > Checkout
TABLE OF CONTENTS
- Overview
- How to Check Out an Appointment & Adjust Invoice Items
- Applying Coupons & Adjustments to an Invoice
- Applying Tips to an Invoice
- How Tax is Calculated on Invoices
- How to Pay an Invoice
- More Information
How to Check Out an Appointment & Adjust Invoice Items
1. From the Appointments tab or the Daily Snapshot tab, click the Checkout icon (green cart) next to the pet in question who needs to be checked out.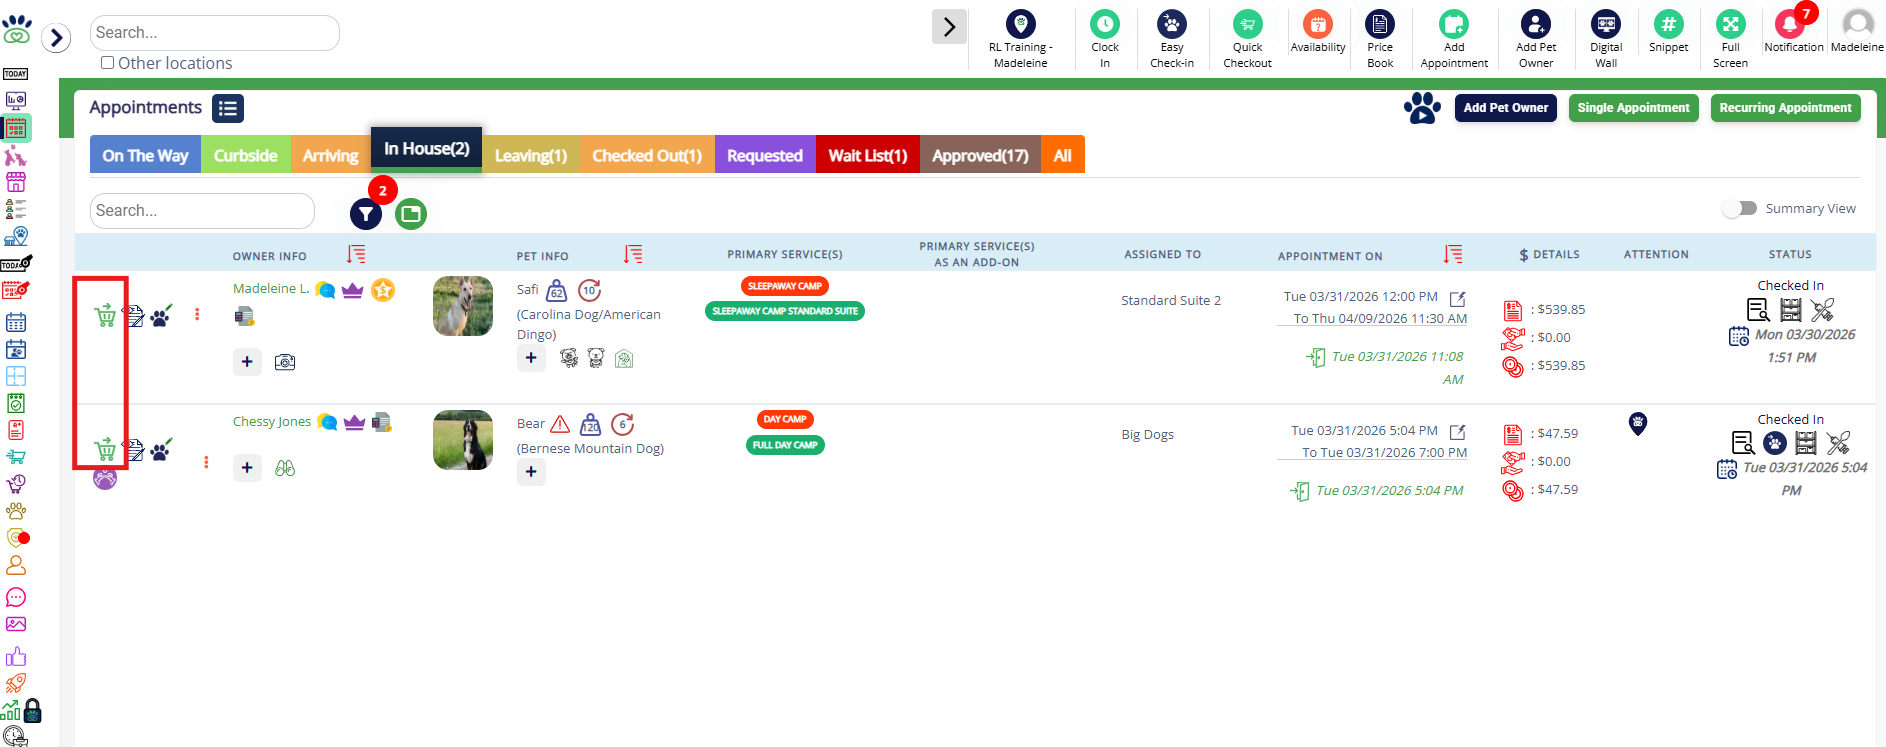
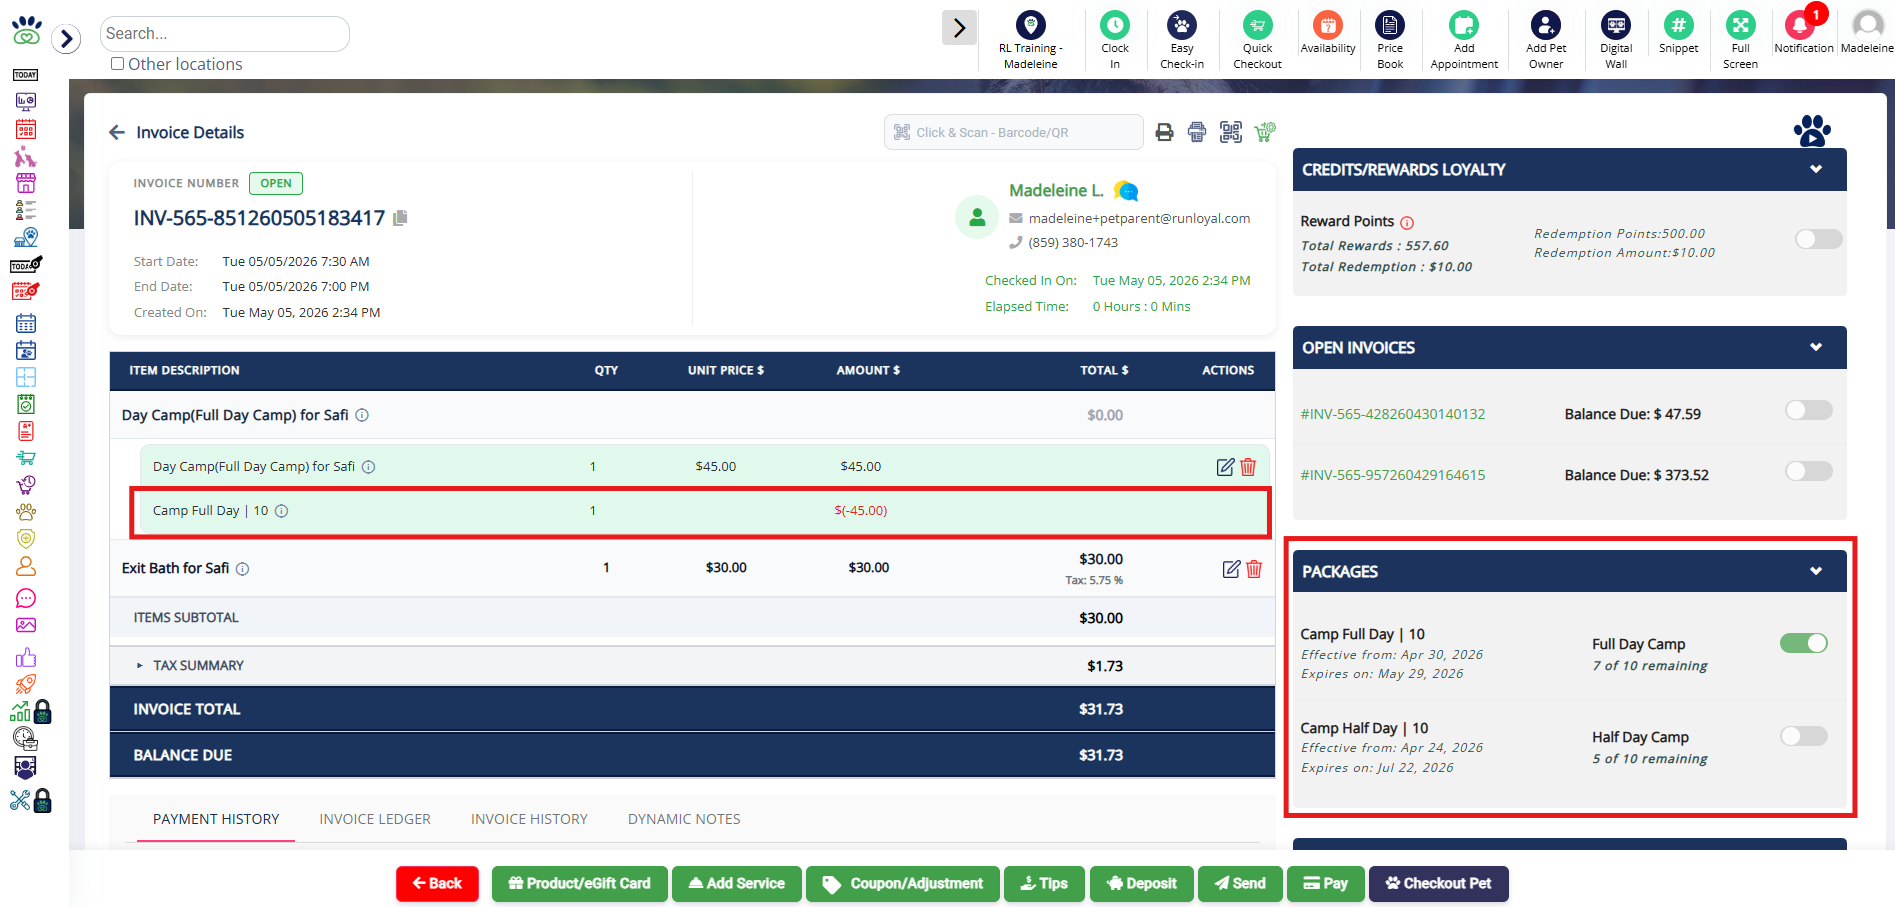
2. If applicable, the right-hand side will display items that can be handled or applied to the invoice. If the pet owner has an available package that can be applied, this will display under Packages. The package can be set to apply by default, or you can apply it manually. You will now see the package discount on the invoice under the item to which it has been applied, changing the cost of the item directly rather than showing in the Adjustments section.
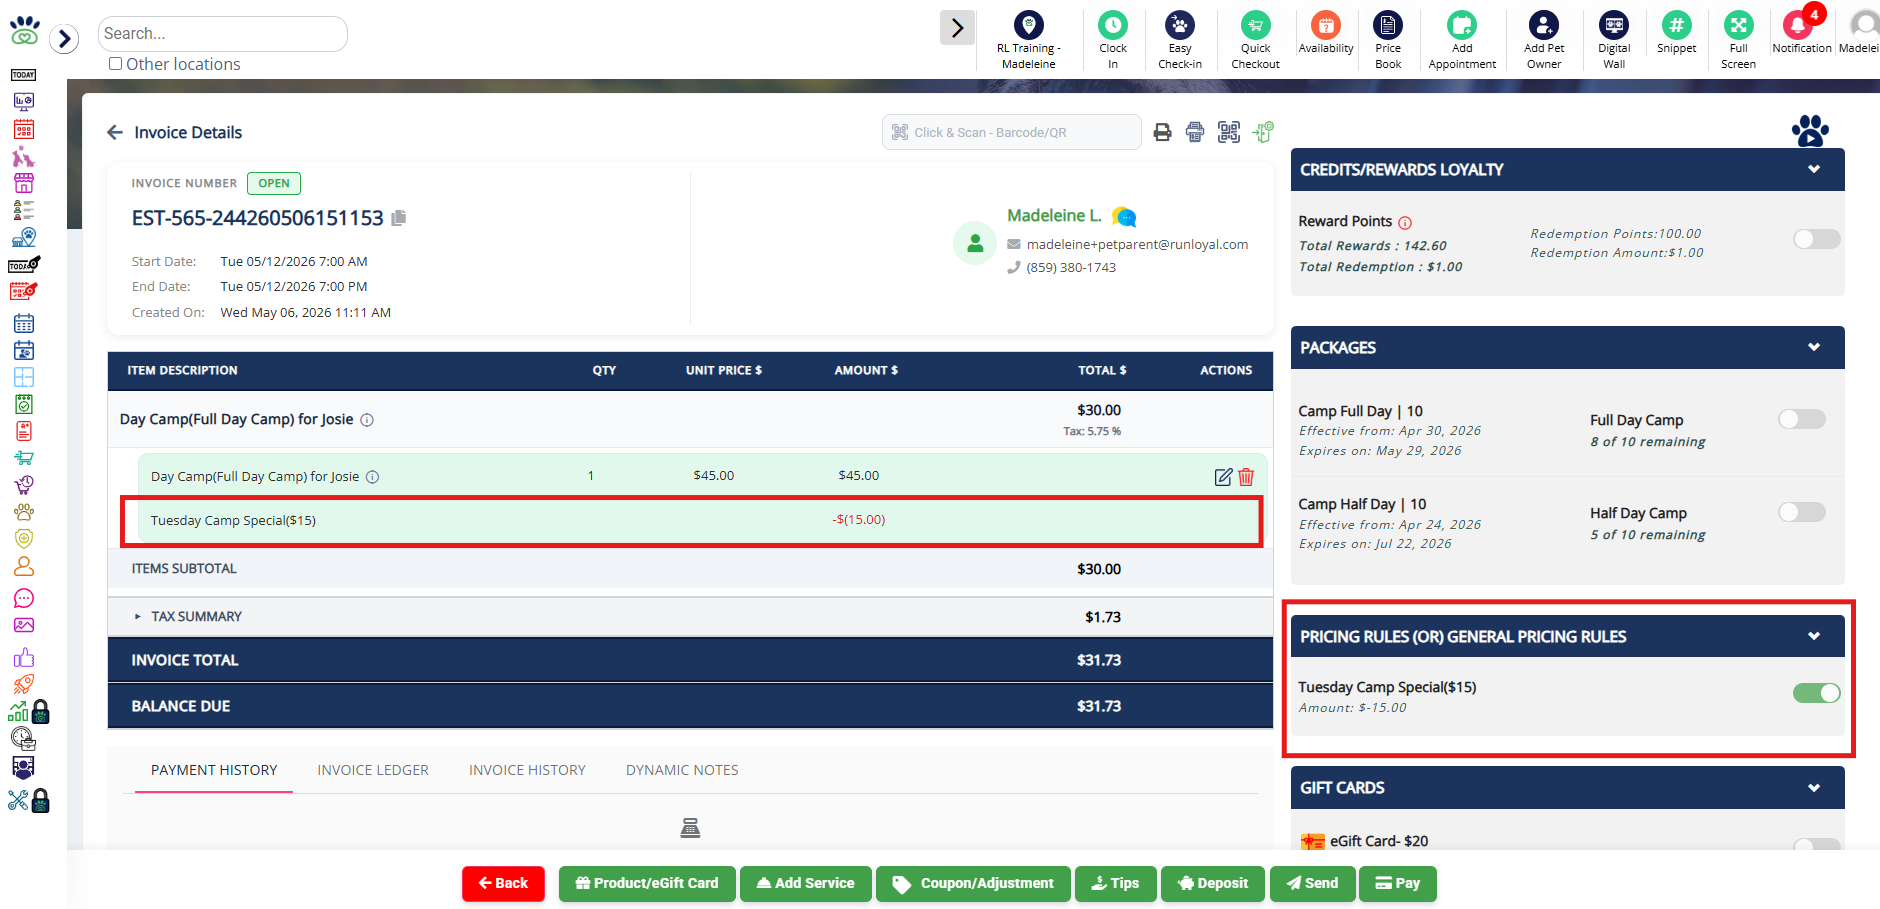
3. If there are pricing rules that apply to the service(s), they will display under Pricing Rules (OR) General Pricing Rules. These are automated discounts or surcharges that can apply to the bill. Once the pricing rule is toggled on, you will now see the surcharge or discount on the invoice under the item to which it has been applied, changing the cost of the item directly rather than showing in the Adjustments section.
5. If the pet owner has Account Credit or Loyalty Points that can be redeemed, these can be applied to the invoice. They will now display as a payment on the invoice rather than showing in the Adjustments section. 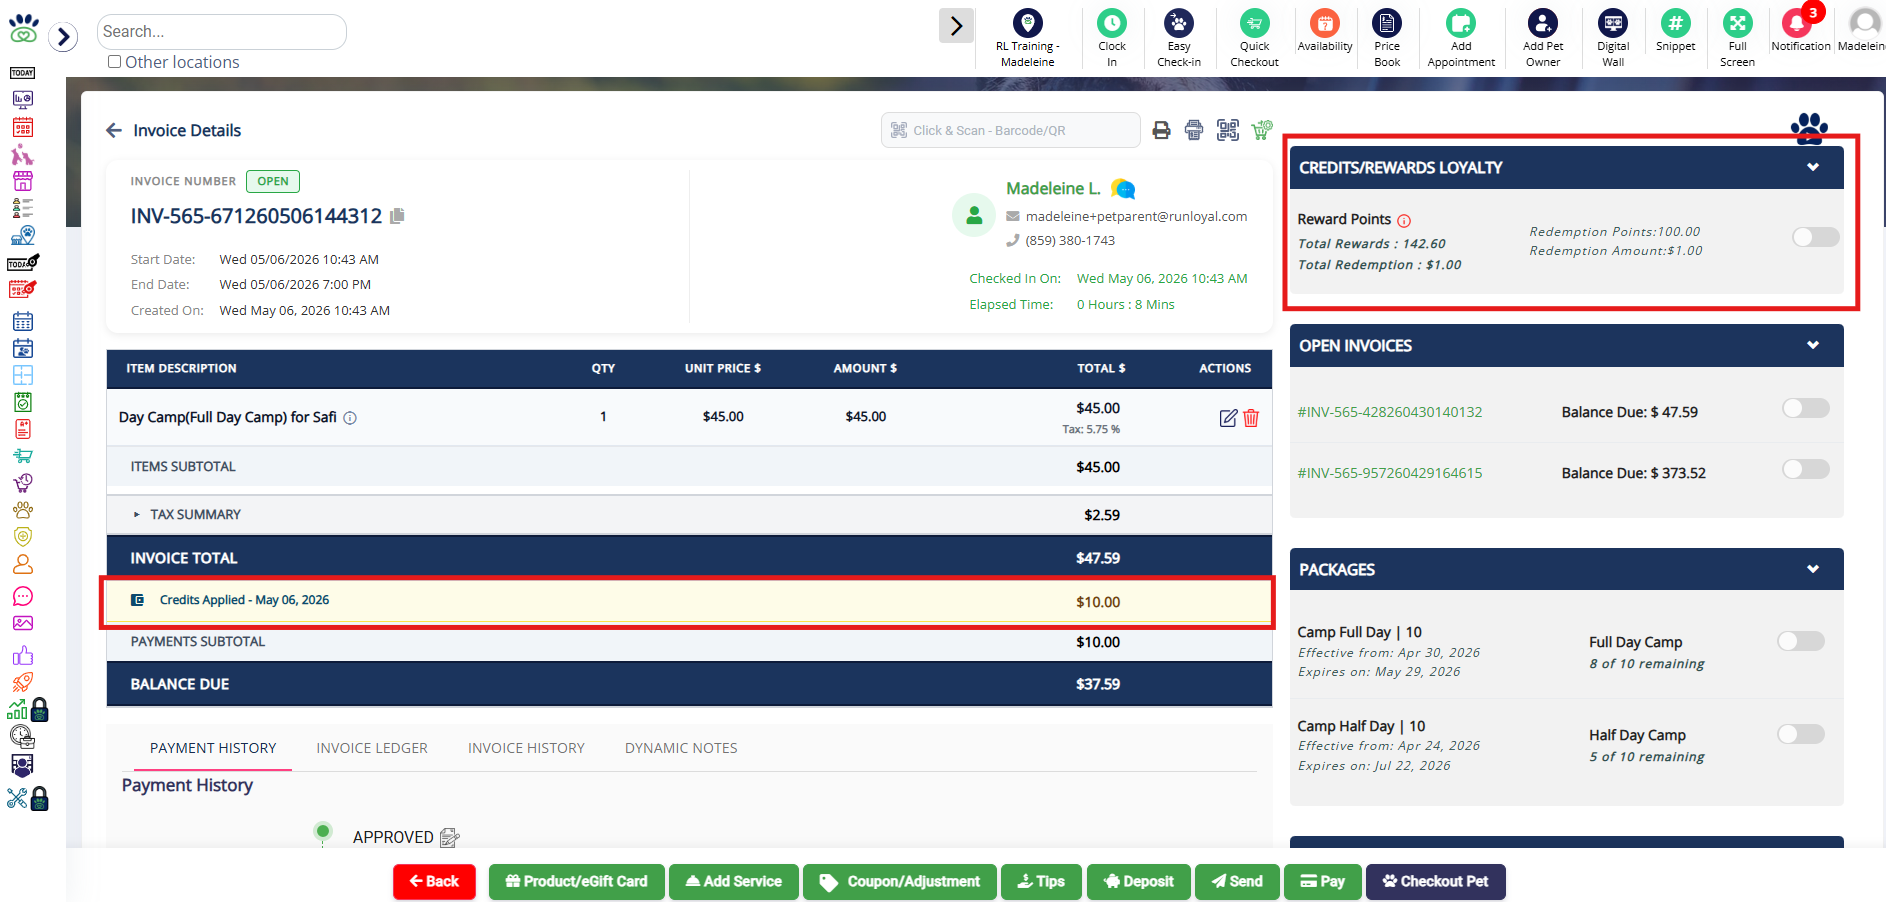
6. If the pet owner has Gift Cards, these can be applied to the invoice. They will now display as a payment on the invoice rather than showing in the Adjustments section.
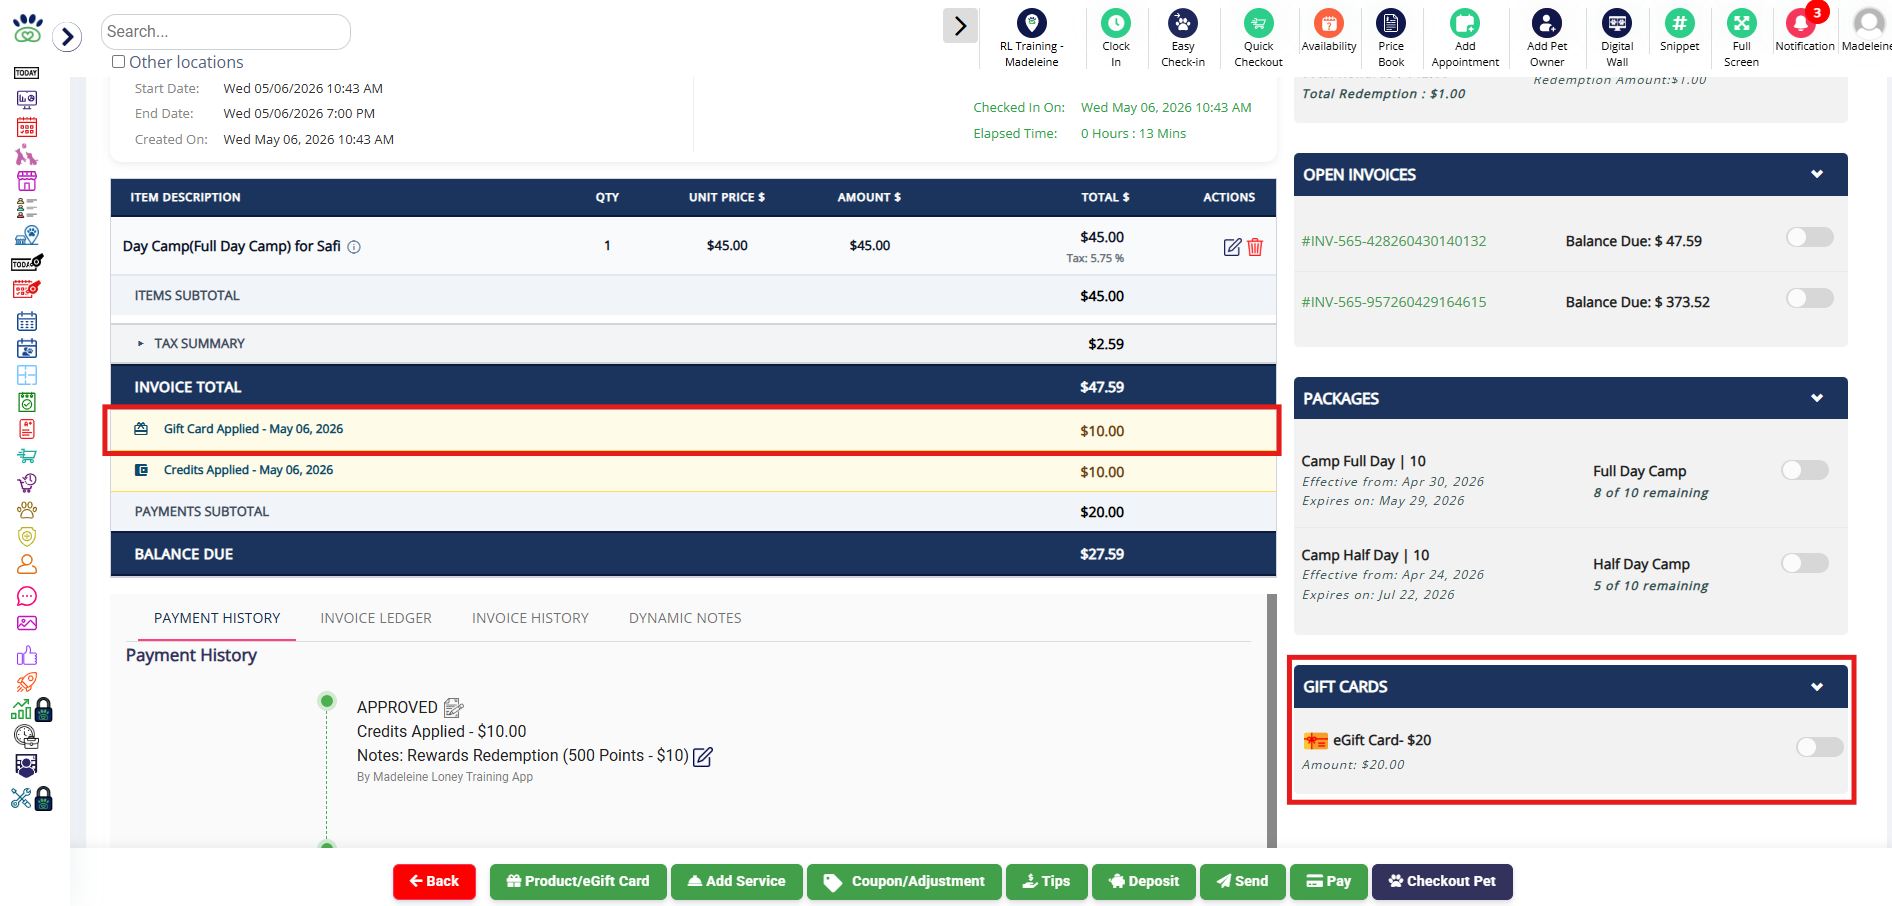
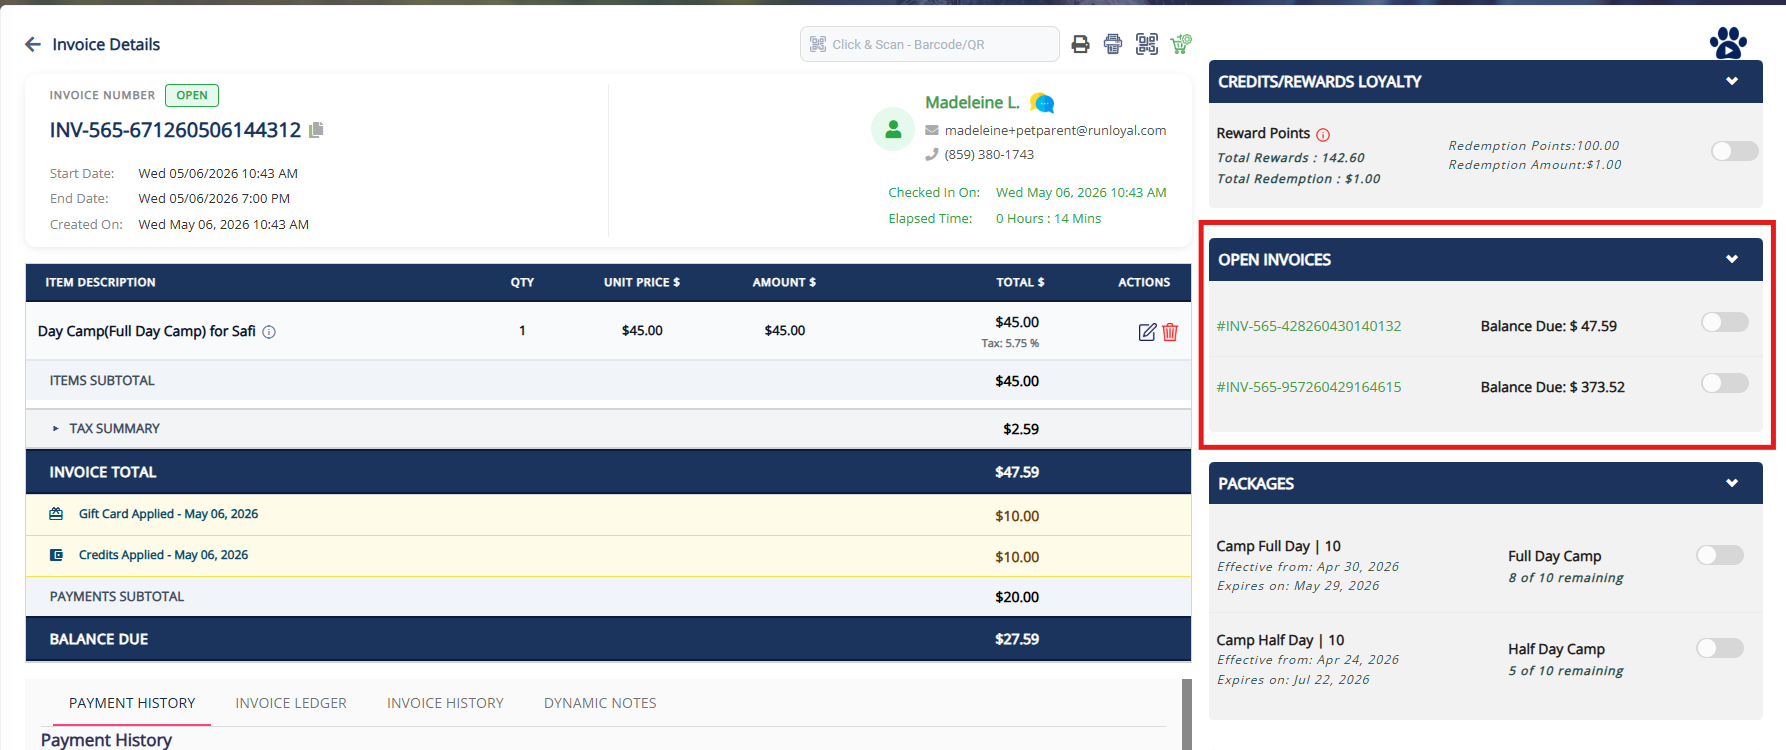
7. If the owner has any other unpaid invoices, these will display under Open Invoices. To view what is on each invoice, click the invoice ID to expand details. You can optionally toggle on the invoice to close the original invoice and add the balance to the current invoice.
⚠️ Important: Merging invoices cannot be undone. Please proceed with caution!
Applying Coupons & Adjustments to an Invoice
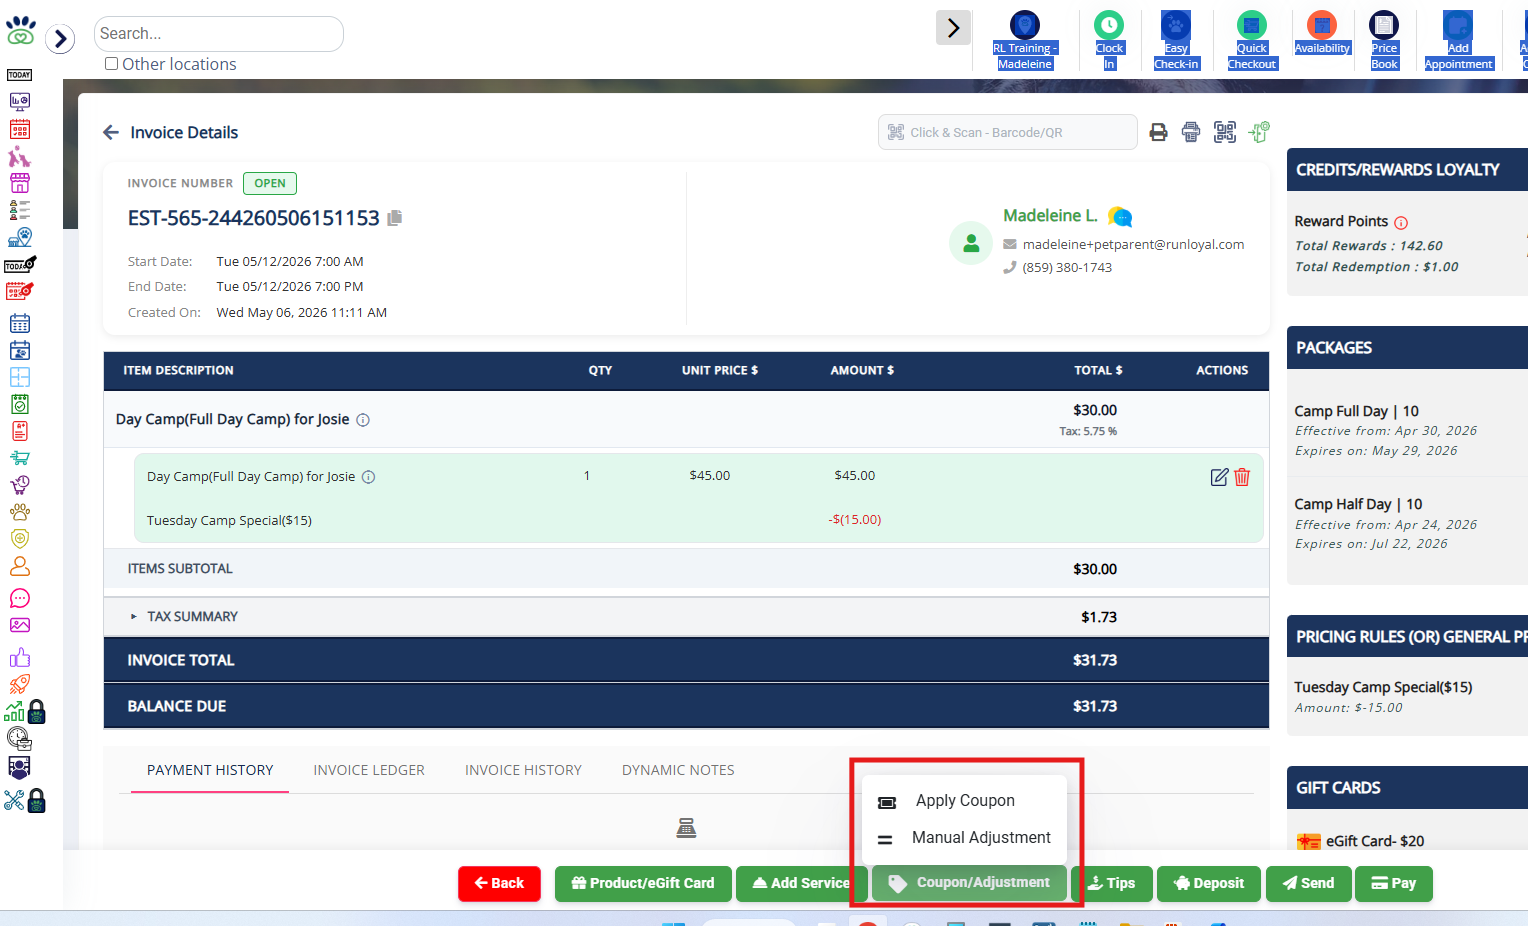
1. After confirming the items on the invoice, you can also apply Coupons to further adjust the cost of the items. To apply a coupon, click Coupon/Adjustment at the bottom of the invoice, then select Coupon.
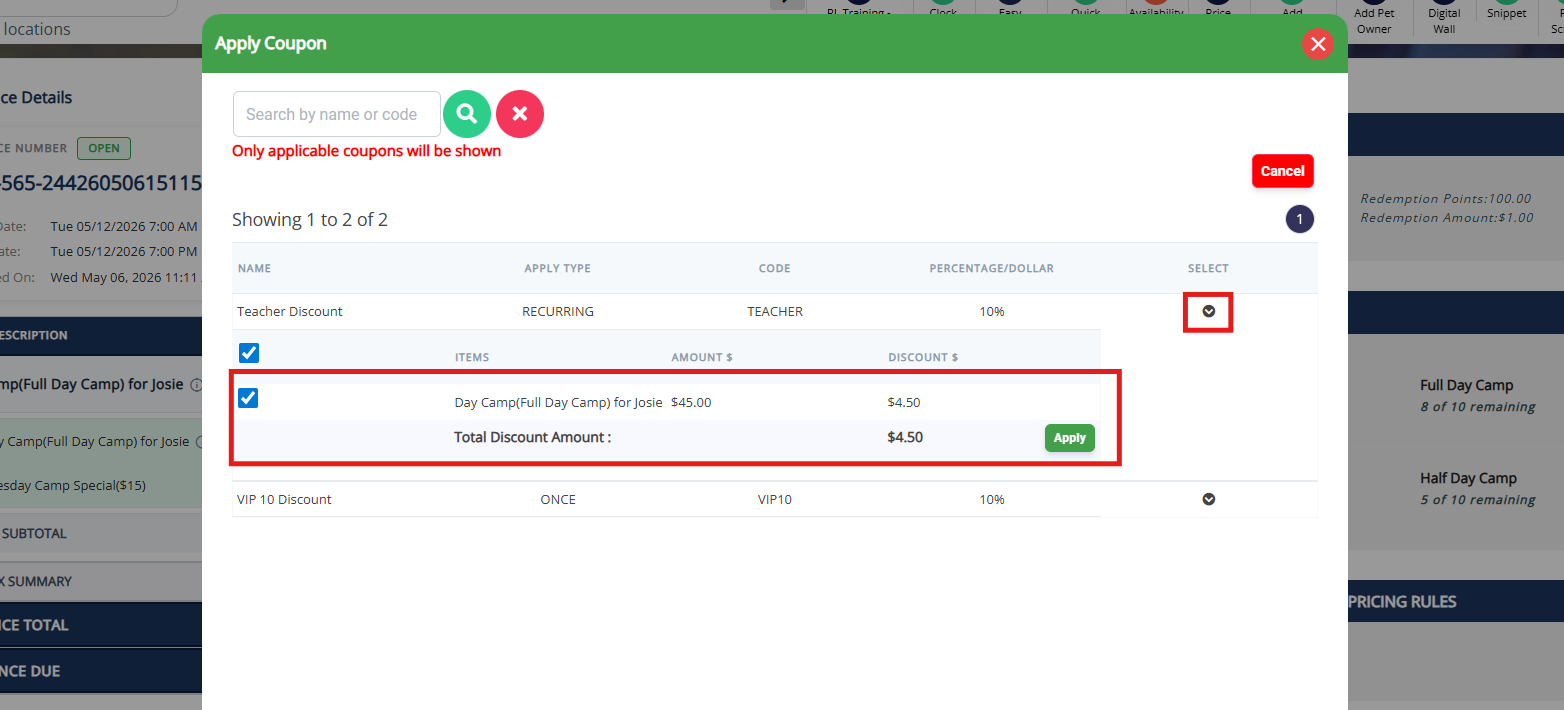
2. Find the coupon you wish to apply and click the arrow under Select to expand it. If you wish to apply the coupon to all items, leave the boxes checked next to all items. If you wish to apply it selectively to only some items, then uncheck the boxes next to the items where it should not apply. Then click Apply.
3. Once the coupon is applied, you will now see the discount on the invoice under the item to which it has been applied, changing the cost of the item directly rather than showing in the Adjustments section.
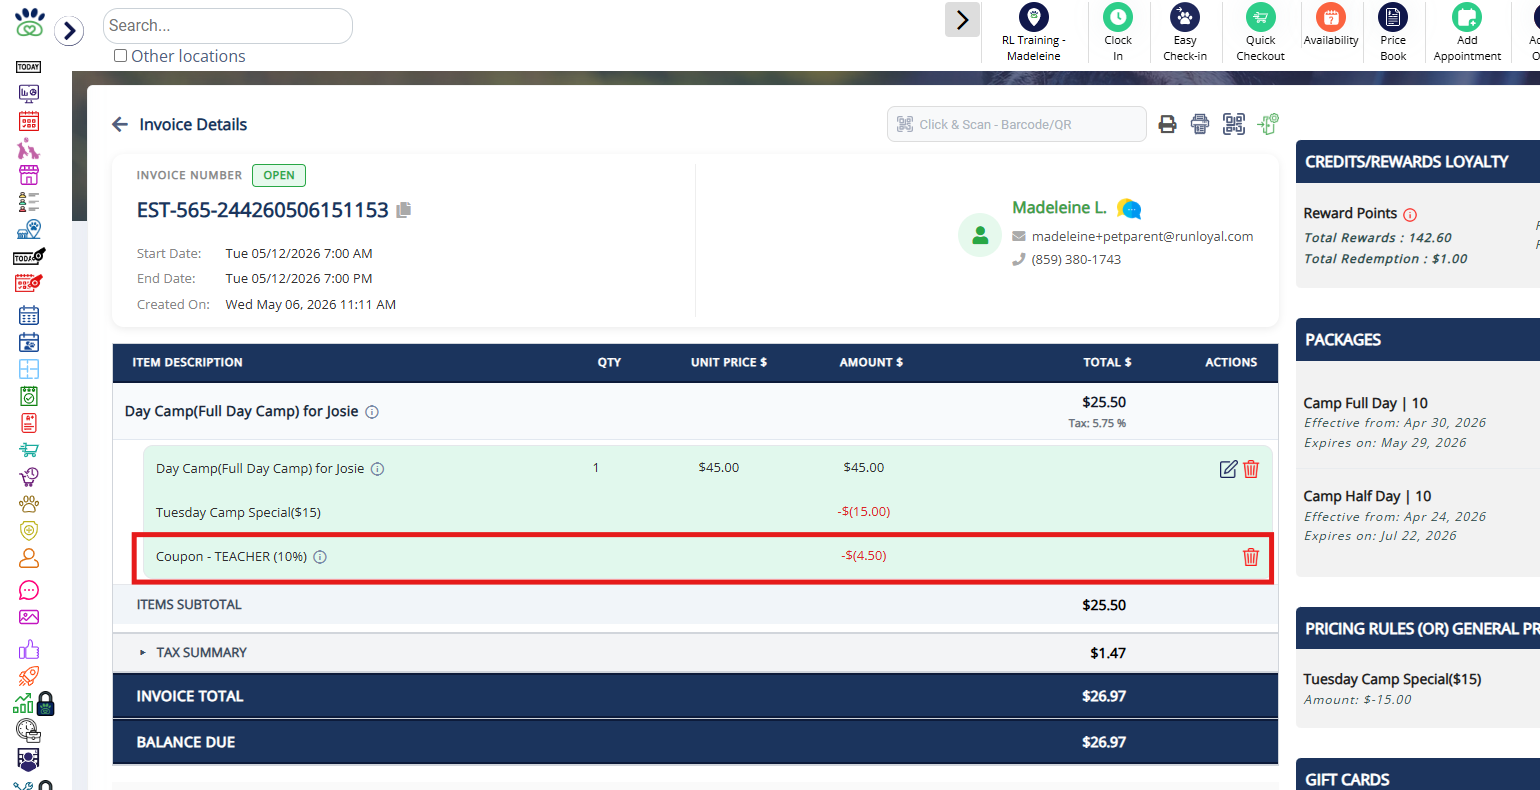
4. To apply a manual adjustment to a specific item, click Coupon/Adjustment at the bottom of the invoice, then select Manual Adjustment.
5. Find the item that should have the price changed and enter the amount of the adjustment. Make sure to enter a negative amount if you wish to discount the item! Then click Apply.
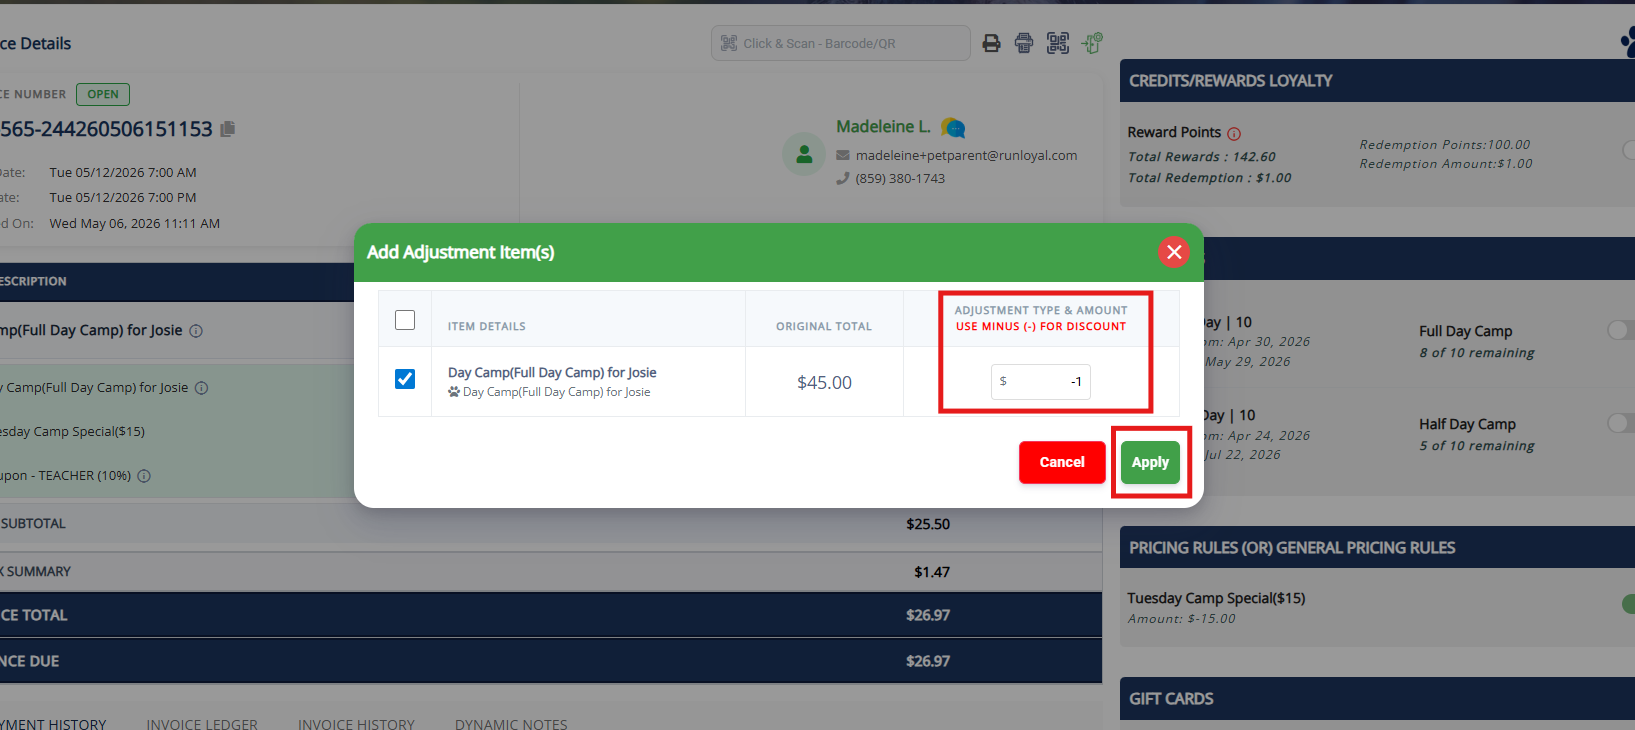
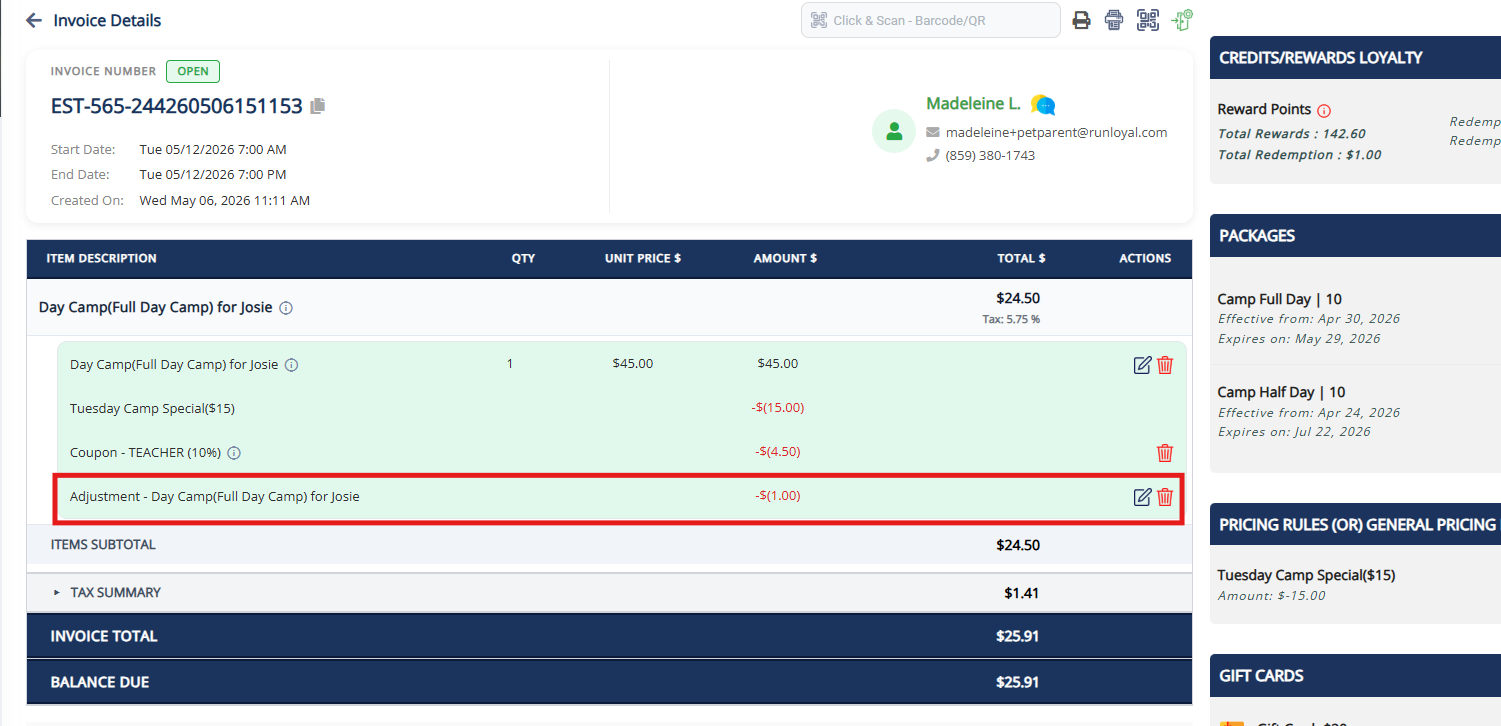
6. Once the adjustment is applied, you will now see the discount or surcharge on the invoice under the item to which it has been applied, changing the cost of the item directly rather than showing in the Adjustments section.
Applying Tips to an Invoice
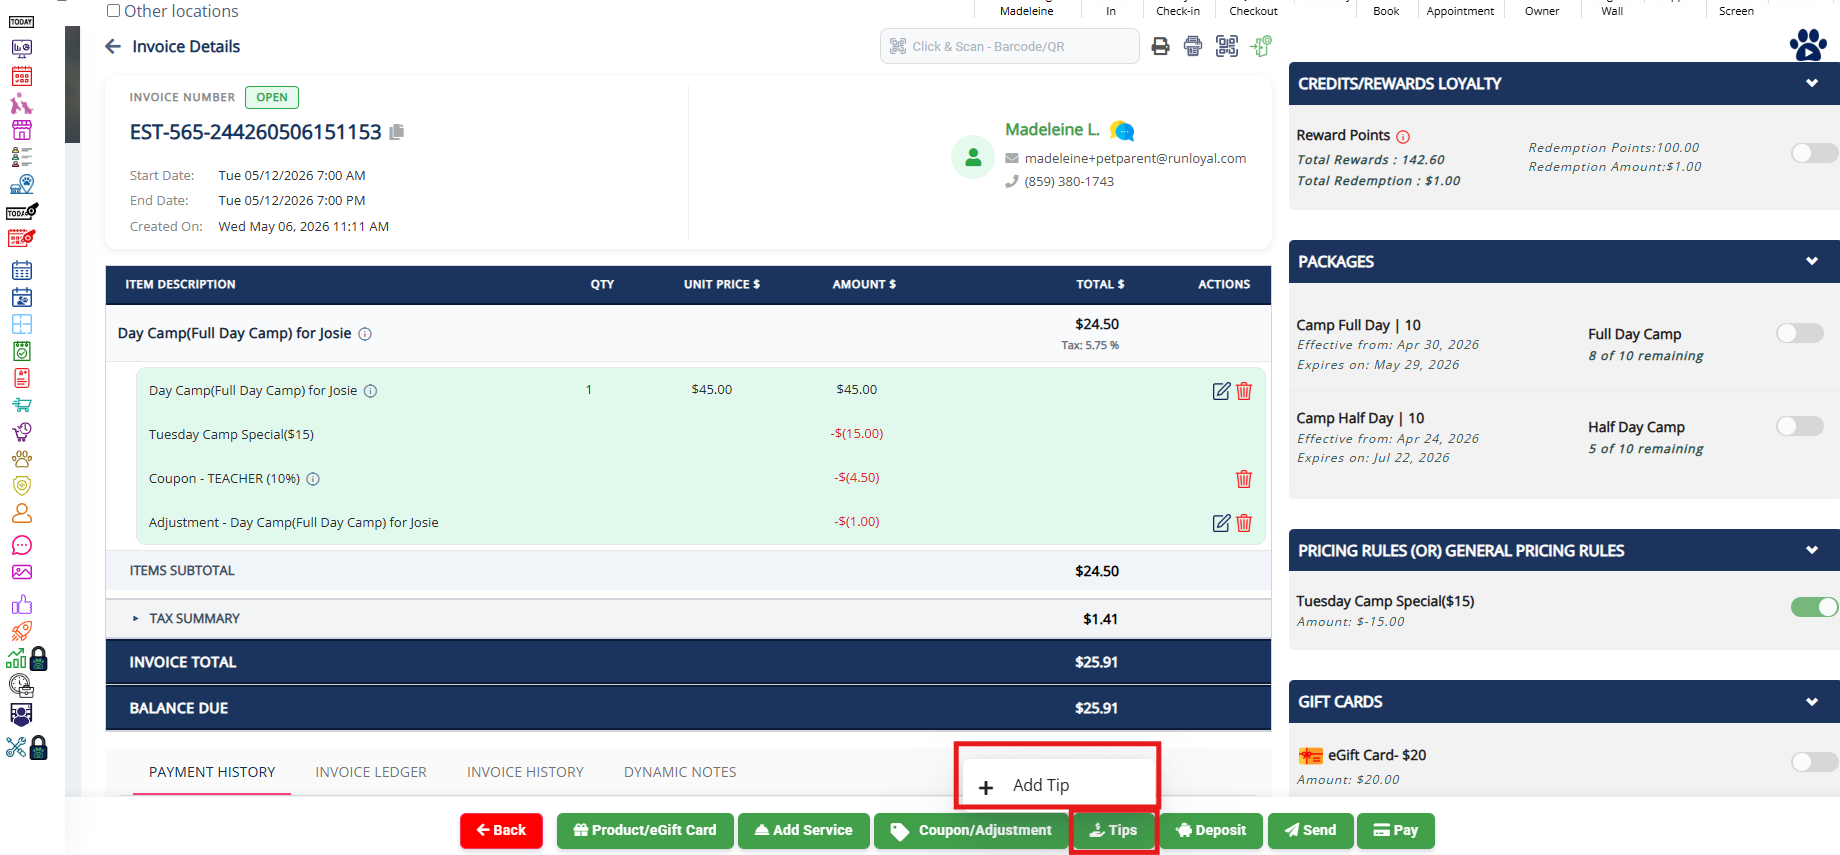
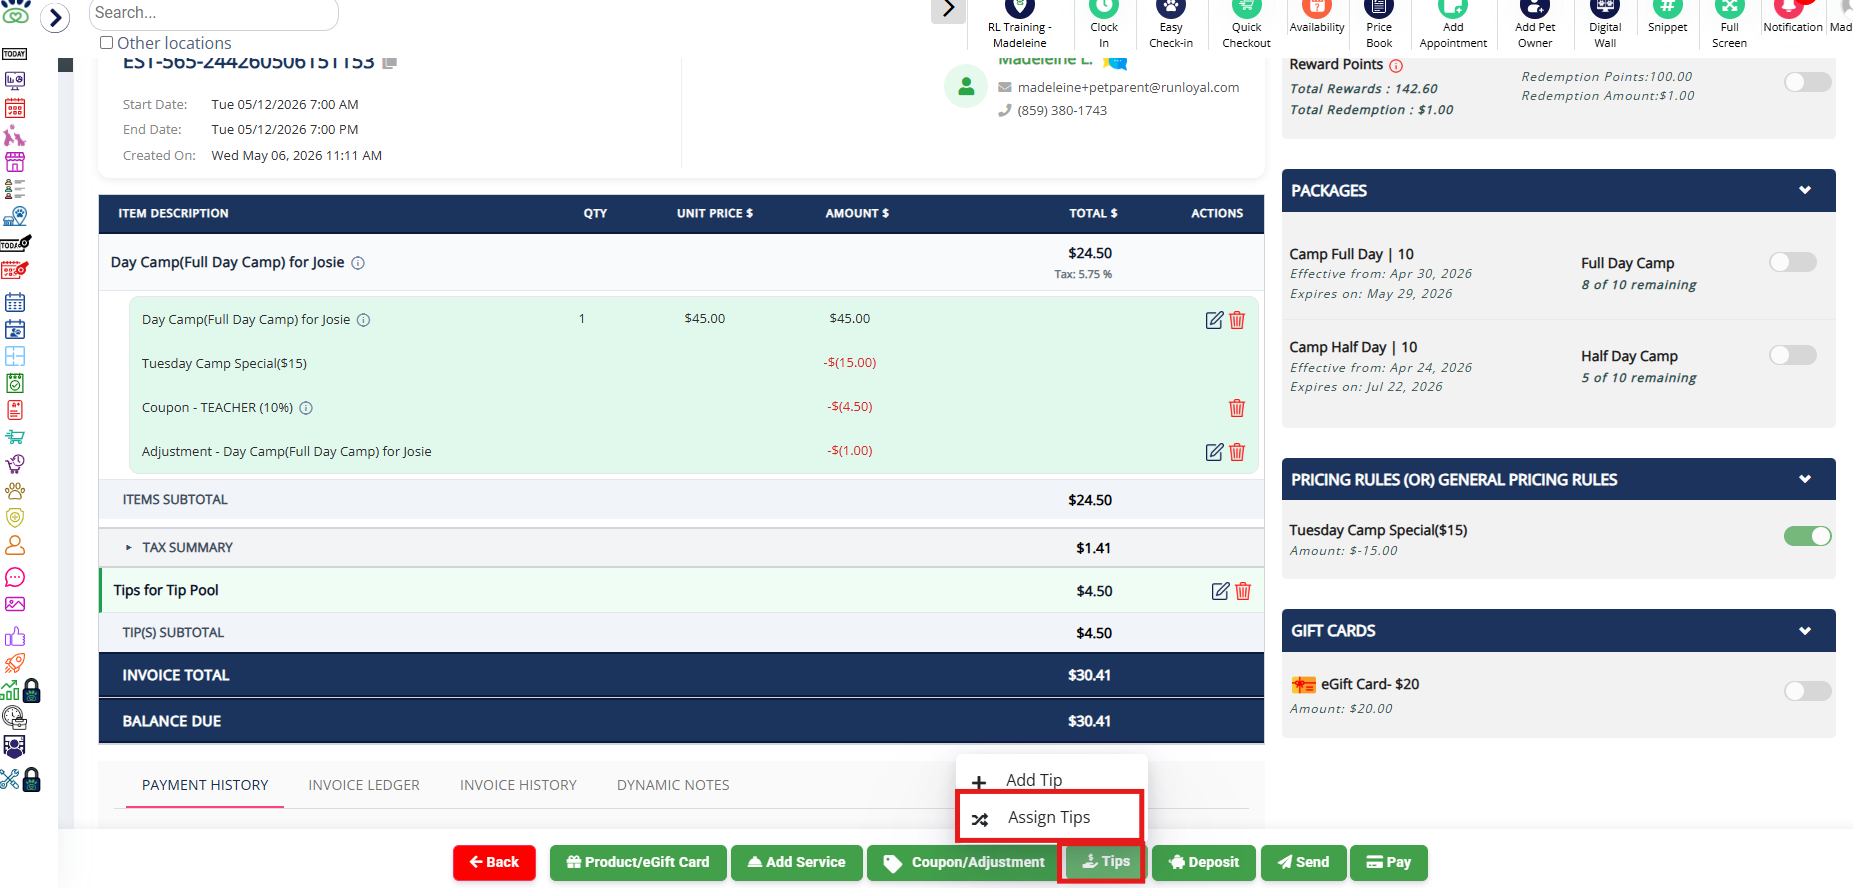
1. To add a tip to the invoice, click Tips > +Add Tip.
2. Select either percentage or dollar, then select the percentage (or choose custom) or enter the flat dollar amount.
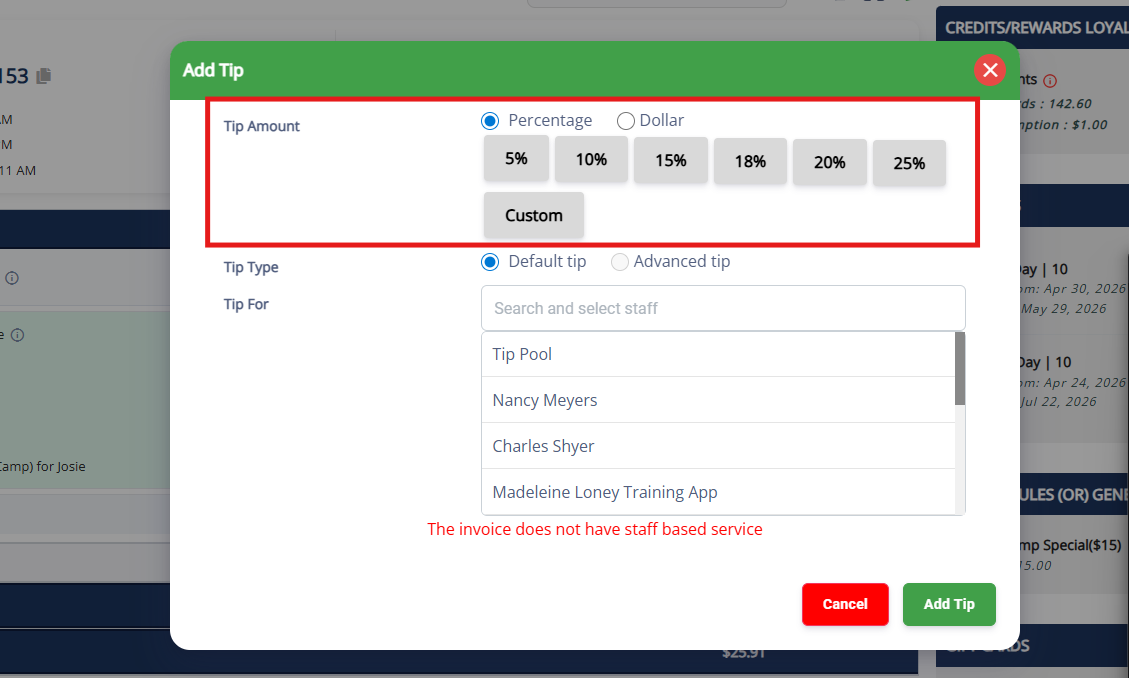
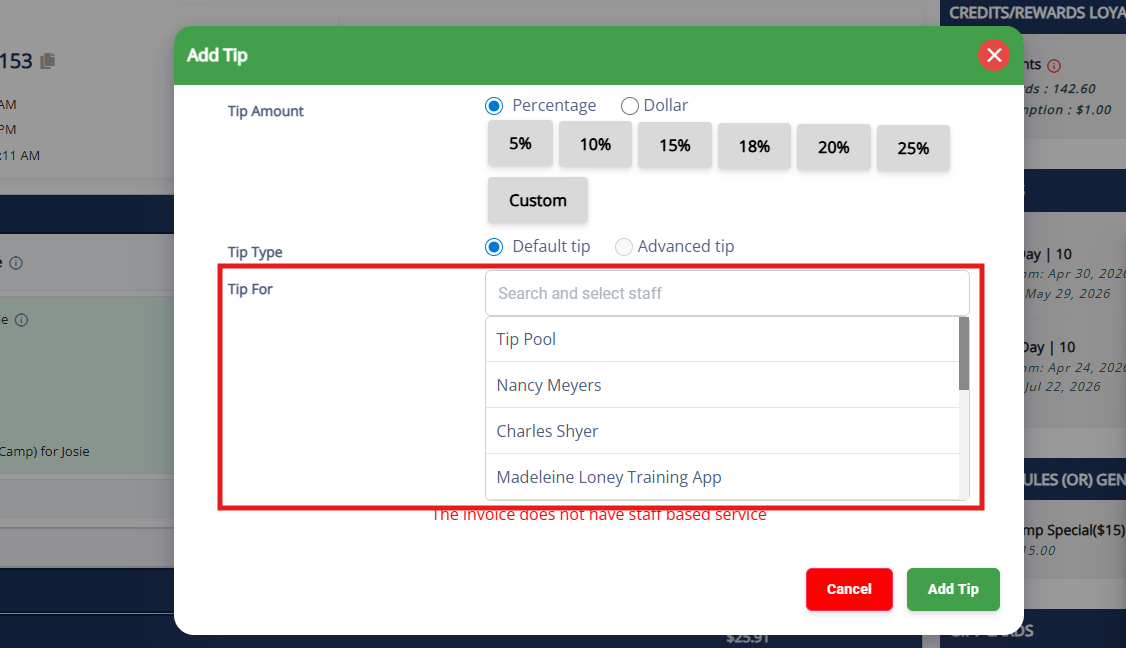
3. If the only items on the invoice are staff-based, then the tip will automatically assign to the staff user who performed the service. If there are other non-staff items on the invoice (such as daycare), then you can select the user to the tip should apply. Then click Add Tip.
4. If you wish to assign tips later to split a tip between the tip pool and a user, click Tips > Assign Tips. You can then adjust the tip amount going to each user.
How Tax is Calculated on Invoices
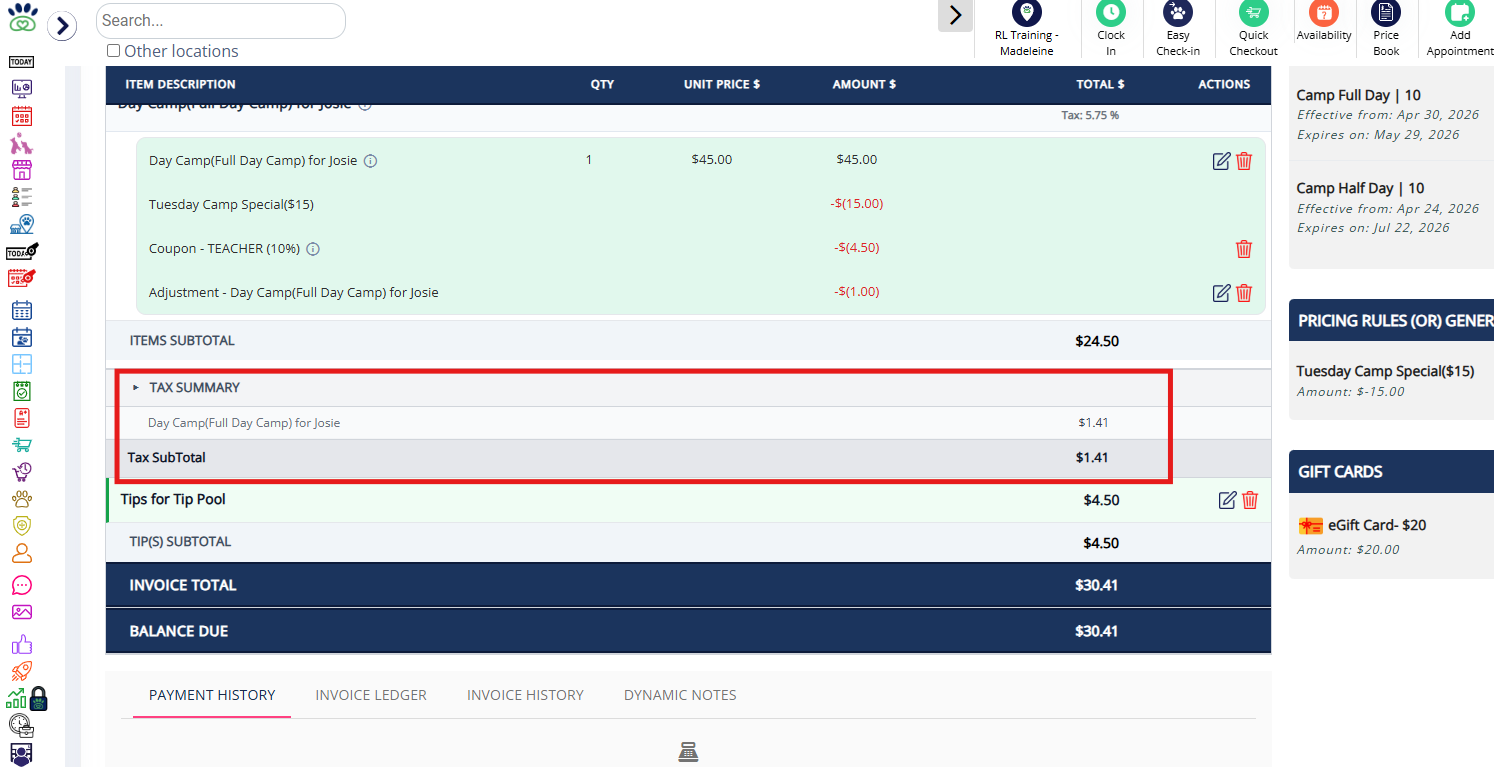
1. For any taxable items, tax will also be assigned in the Tax section of the invoice. With the new invoicing update, tax is then calculated on the discounted amount. This means tax totals on invoices and financial reports now reflect the actual taxable amount your customer paid.
For example, if a taxable item was originally $45 but received discounts making it $24.50, the tax would be charged off of $24.50.
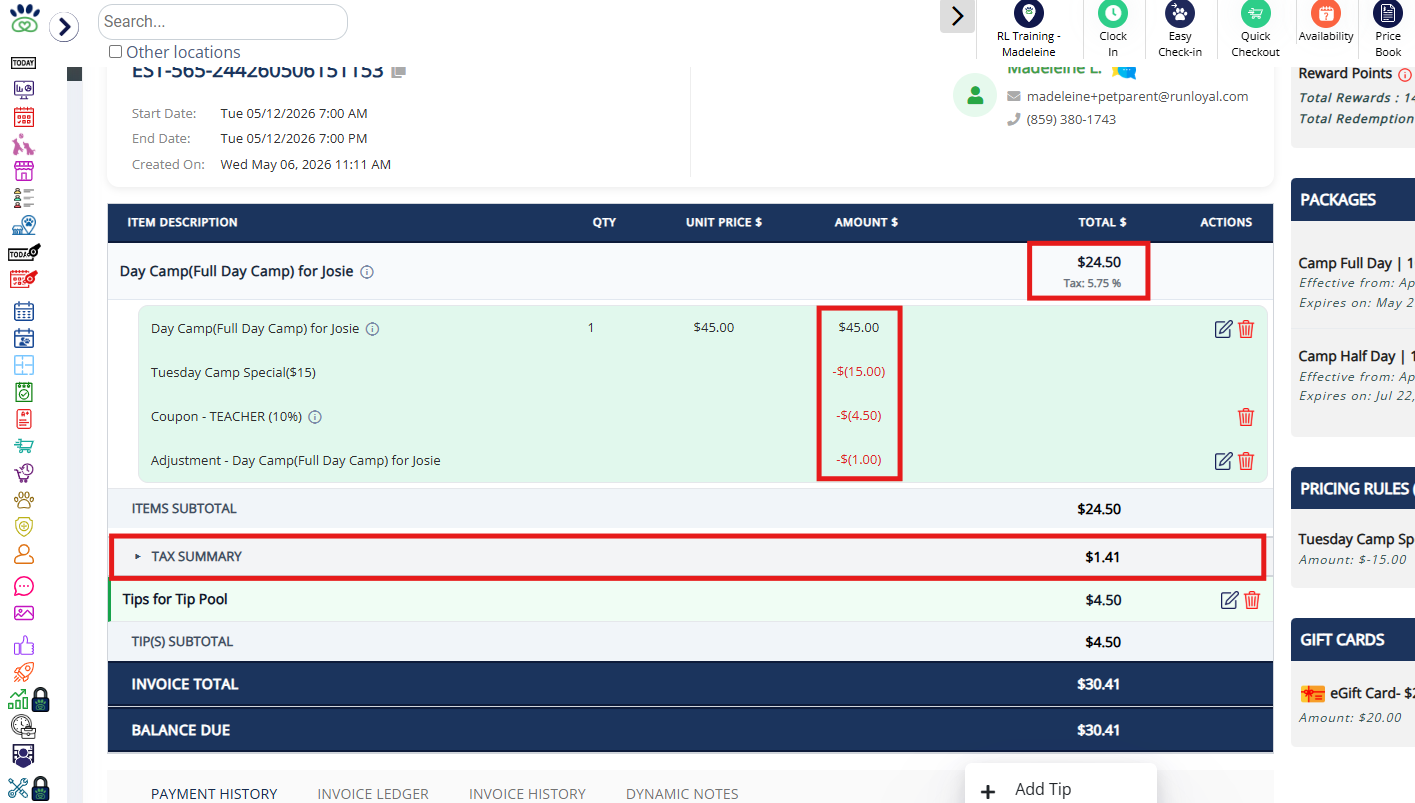
2. To see the tax total for every taxable item on the invoice, click the arrow next to Tax Summary to expand this section.
How to Pay an Invoice
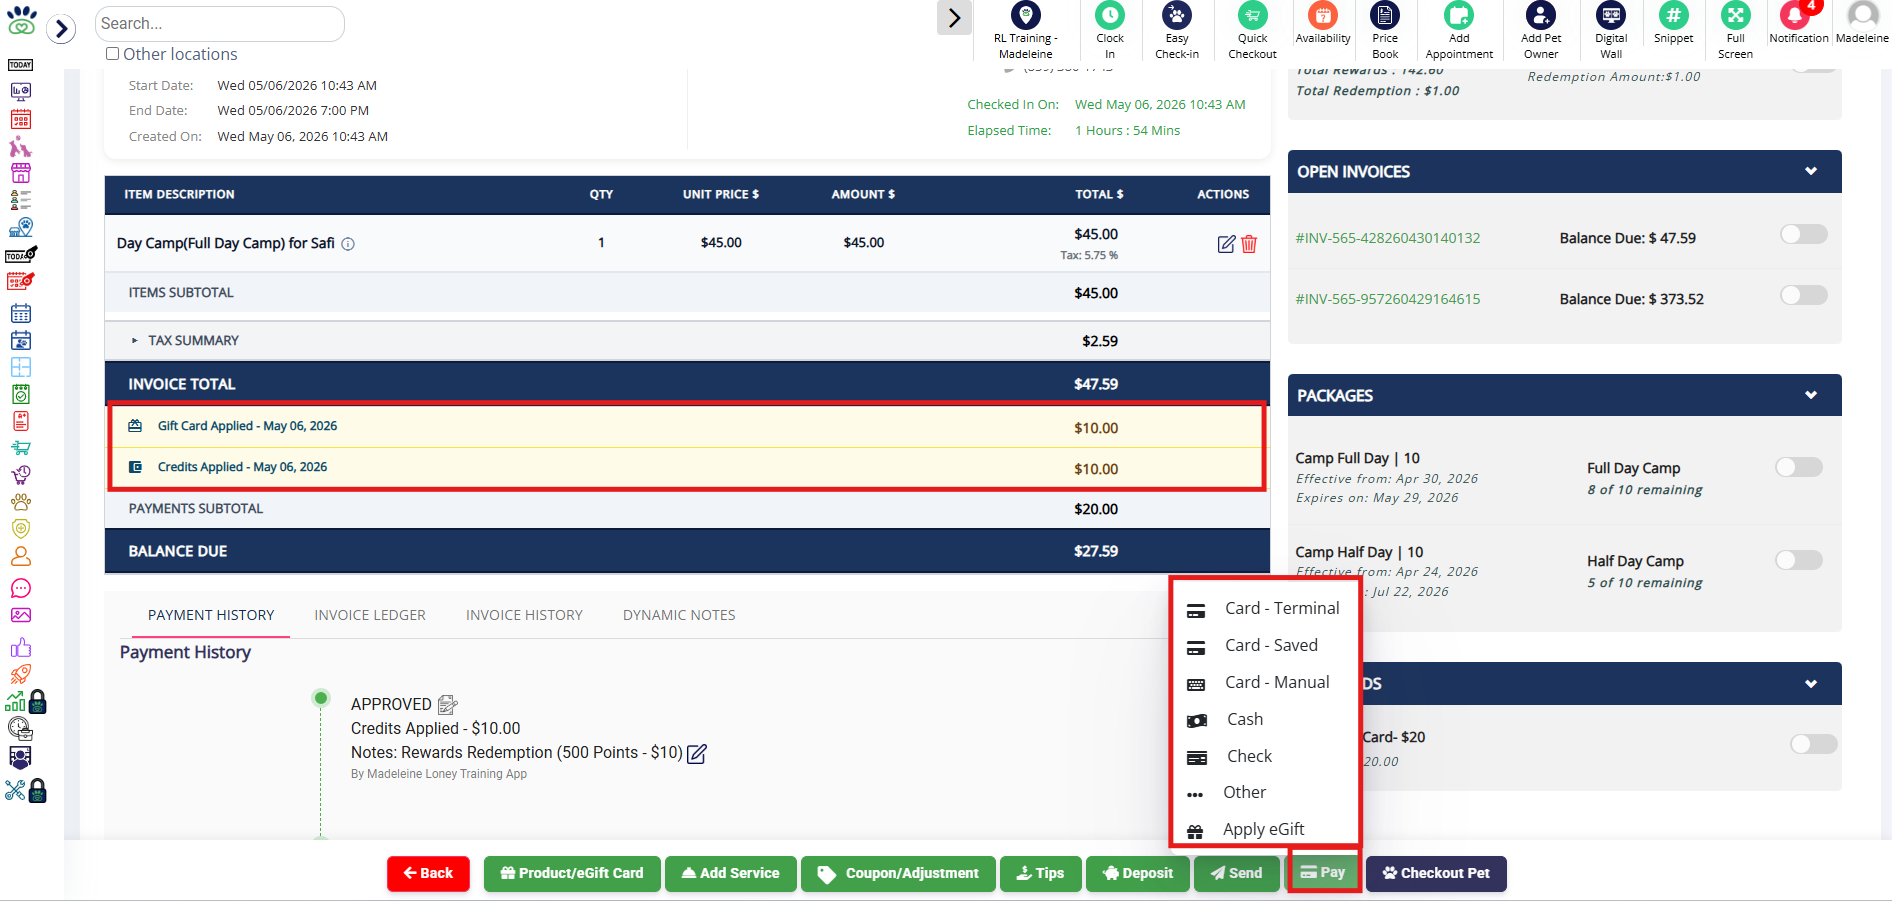
1. After confirming the items on the invoice, it's time to collect payment! Existing payments will display on the invoice under Payments. If additional payment is required, when you are ready to collect payment, click Pay and then select the payment method (card, cash, check, other).
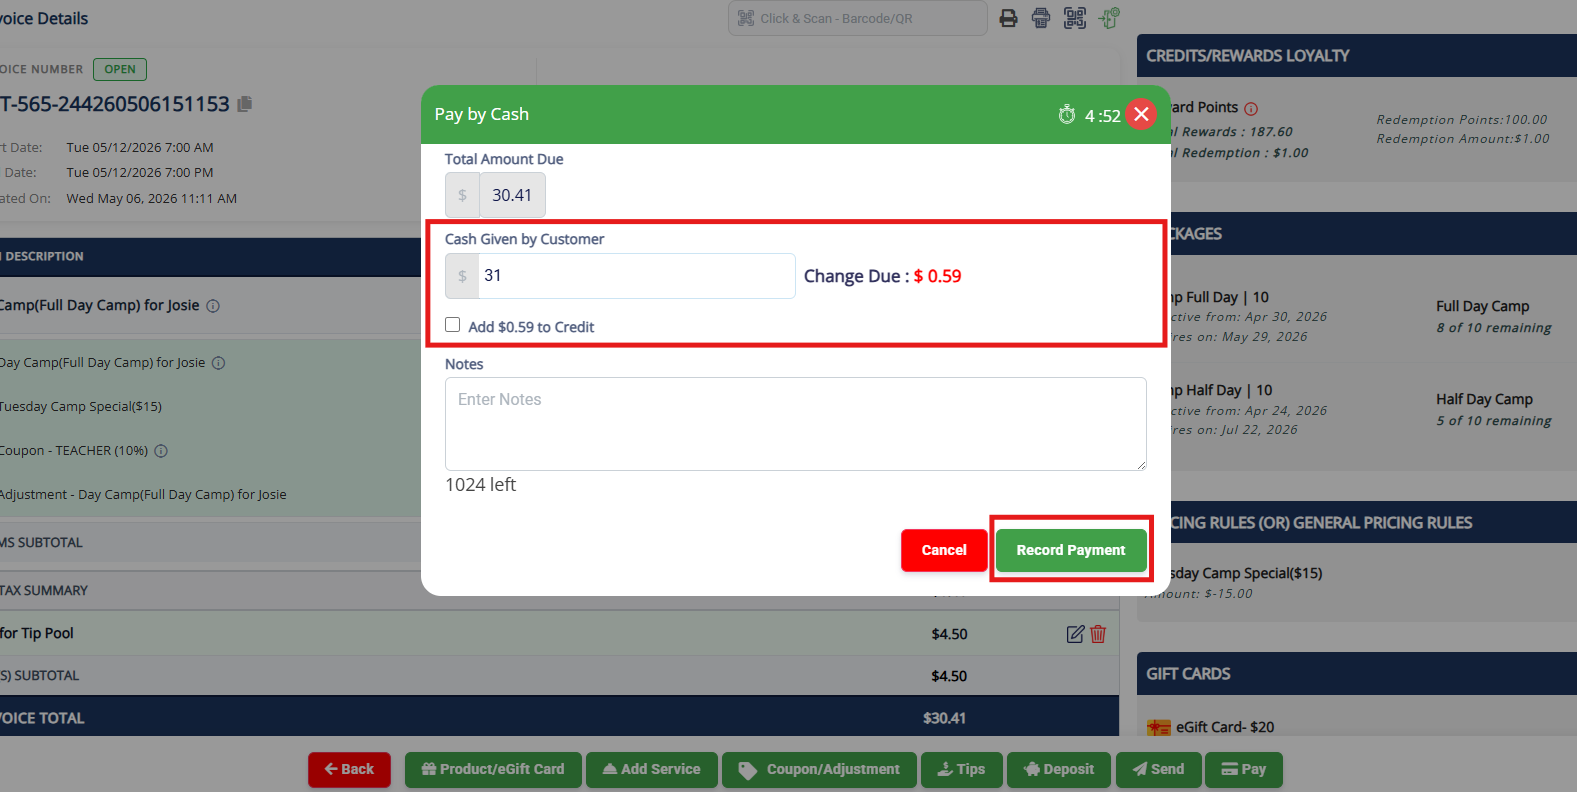
2. The amount due on the invoice will show in light gray. If you wish to enter a partial payment without fully paying the invoice, enter the amount in the box and click Record Payment. If you enter over the amount due, you will be prompted to either give change or add the overage to account credit.
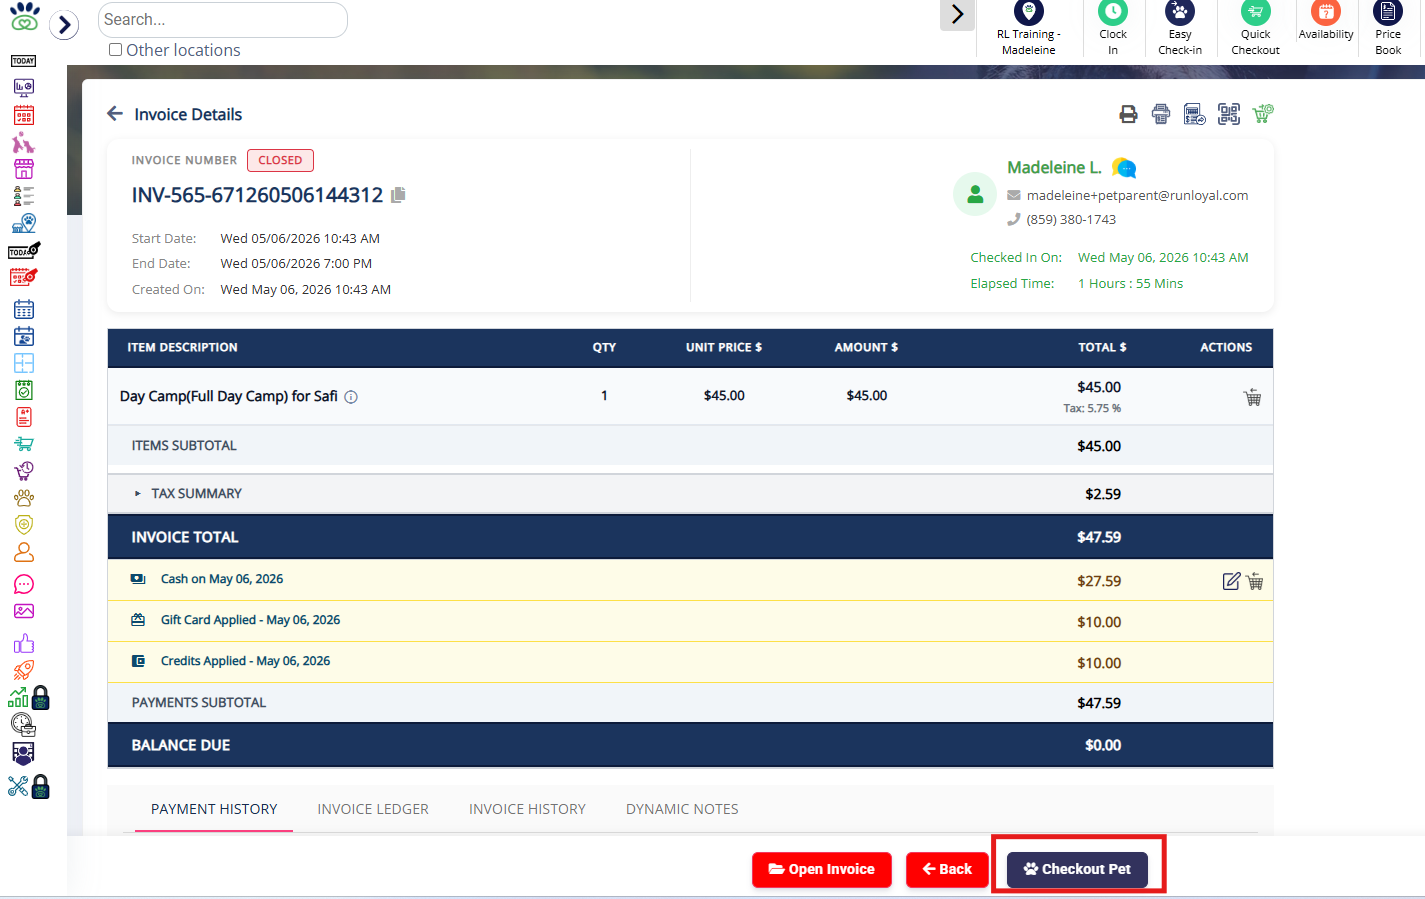
3. Once the invoice is fully paid, it will automatically become a Closed Invoice. Then click Checkout Pet to complete the appointment checkout.
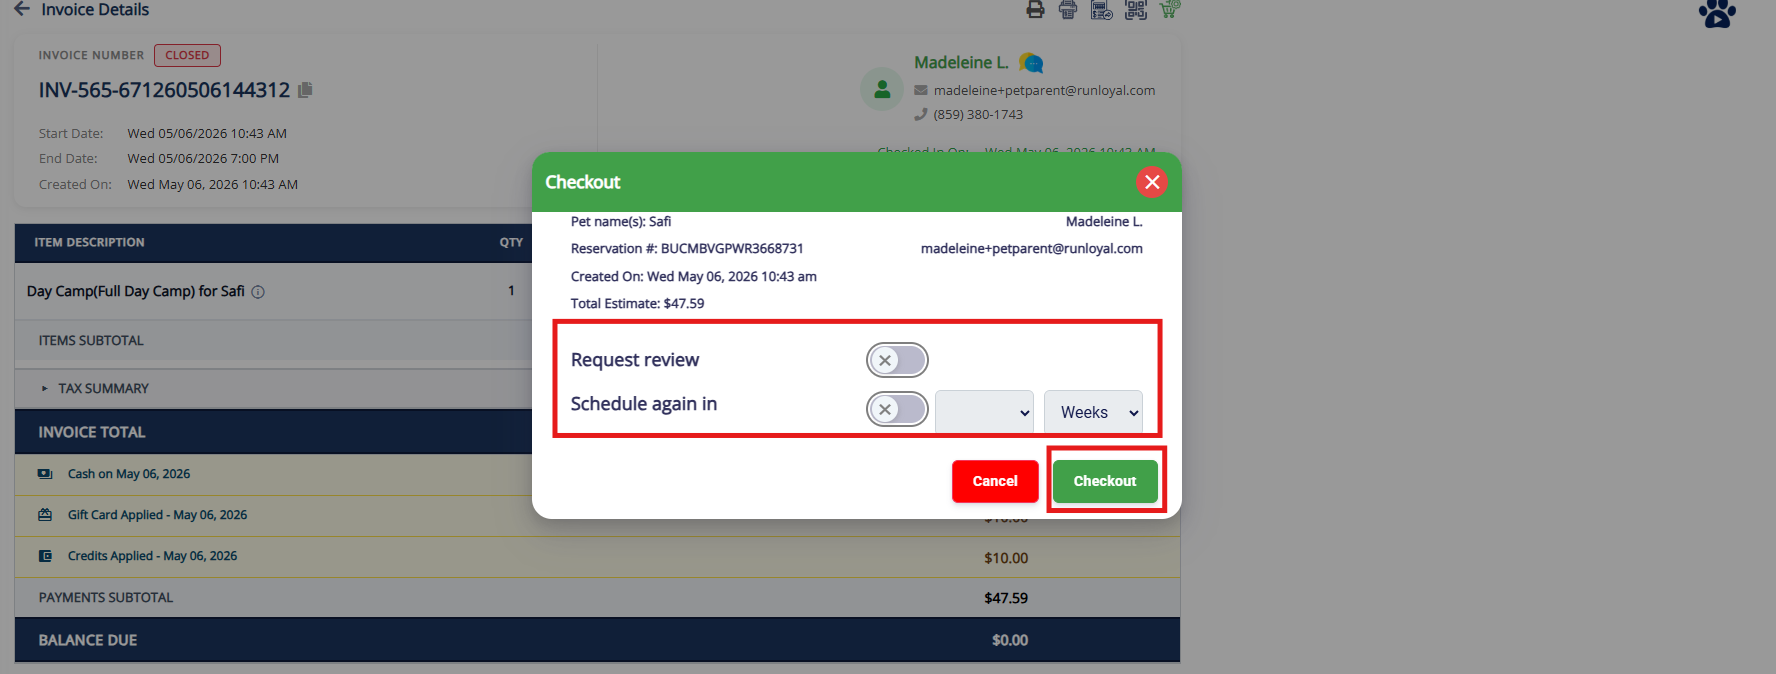
4. You can optionally toggle on to request a review from the pet owner, and/or schedule the pet for a future appointment. Once you have confirmed the toggles, click Checkout.
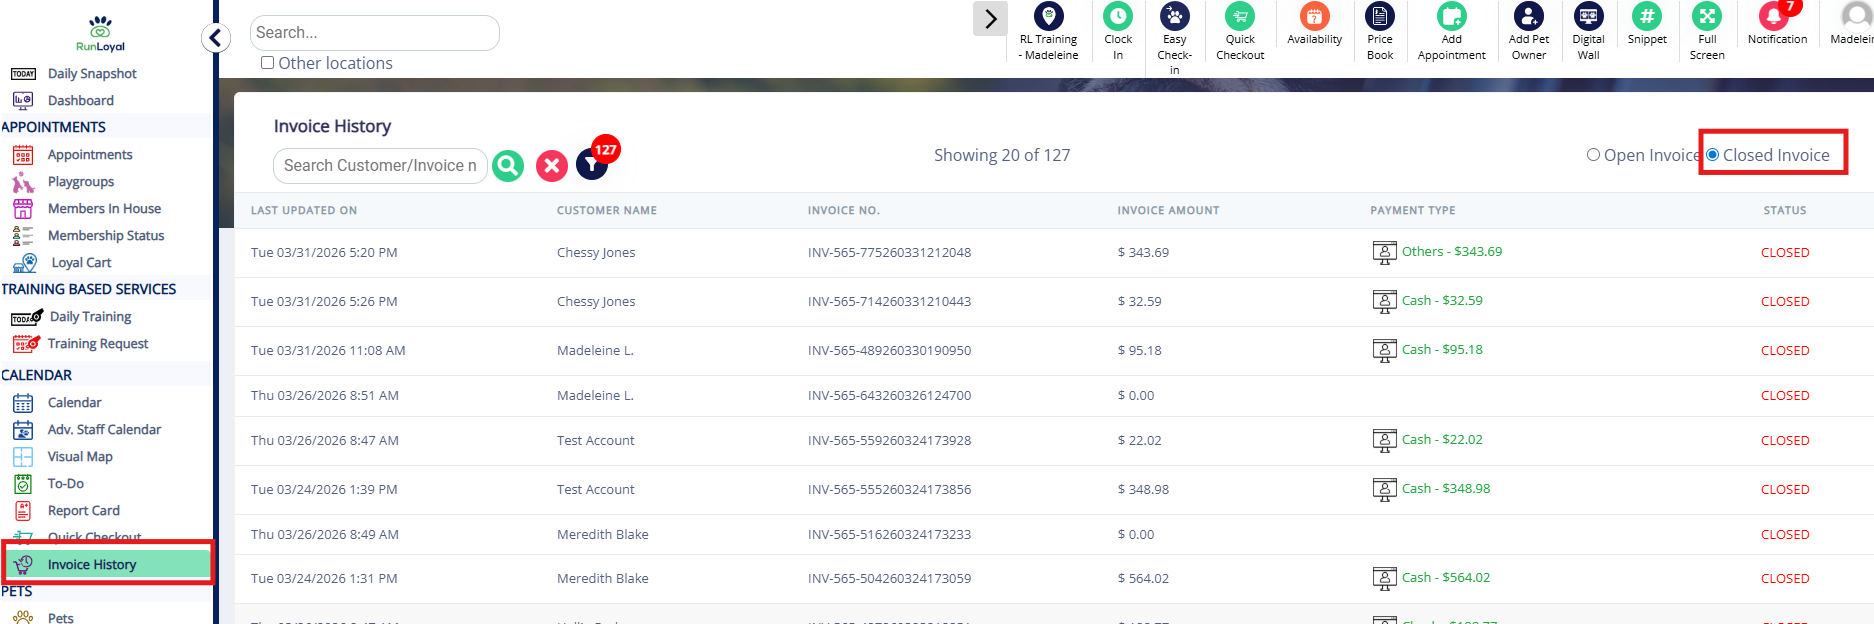
5. This fully paid invoice will now display in Invoice History > Closed Invoices.
More Information
For more information on checking in appointments, please refer to this article: Checking In an Appointment
For more information on Quick Checkout (purchasing packages or retail), please refer to this article: How to Use Quick Checkout
Was this article helpful?
That’s Great!
Thank you for your feedback
Sorry! We couldn't be helpful
Thank you for your feedback
Feedback sent
We appreciate your effort and will try to fix the article